반응형


연결리스트가 팰린드롬 구조인지 판별하라.


input : 1 -> 2 -> 3 -> 2 -> 1

output : true


ListNode 란 ? java에서 기본적으로 제공하는 형태가 아니고 leetCode에서 제공하는 형태이다.


문제를 보면

/**
 * Definition for singly-linked list.
 * public class ListNode {
 *     int val;
 *     ListNode next;
 *     ListNode() {}
 *     ListNode(int val) { this.val = val; }
 *     ListNode(int val, ListNode next) { this.val = val; this.next = next; }
 * }
 */
class Solution {
    public boolean isPalindrome(ListNode head) {
    
    }
}


ListNode가 어떤 클래스인지 명시해준다.


int val 이라는것을 값으로 쓰고

next 라는것으로 다음 노드를 지칭한다.


해당 자료형이 java 에서 내가모르는 자료형이 있던가? 고민하지말자.


일단 ListNode는 List<String> 과 같은 ArrayList완 다르다.

index를 쓸수없고, ListNode 에 [1,2,3] 이 담겨있다고하면 얘네는 앞에서부터 순차적으로 가져올수있다.


또한 가져올때 head 라는 요소를 사용하여 순차적으로 가져올수있다. head는 해당 리스트의 시작을 나타내는 포인터 개념이다.

이것은 한번 사용하면 오염되어, 다음 문제때 head 즉 시작위치를 알 수없게 되기때문에 사용할때 유의해야한다.


해당 문제는 ListNode가 팰린드롬인가? 를 묻는 문제이기 때문에 해당 리스트를 뒤집은 결과가 해당리스트와 동일한지 체크하겠다.


리스트 추출방법 1 - Stack

Stack 을 활용하여 리스트를 추출해보자.

class Solution {
    public boolean isPalindrome(ListNode head) {
    	Stack<Integer> stack = new Stack<>();
    }
}


이런식으로 선언하면 안된다고 책에 써있긴 했지만 일단, ListNode 를 담을 스택을 선언해준다.


그리고 파라미터로 들어온 head, 즉 팰린드롬인지 알고싶은 데이터를 사용하면 head위치가 손상되어버리기때문에

별도 ListNode에 해당데이터를 넣어준다.

class Solution {
    public boolean isPalindrome(ListNode head) {
        Stack<Integer> stack = new Stack<>();
        LisNode node = head;

    }
}


이제 node 에 있는 값을 순서대로 stack 에 쌓아준다

ListNode 는 index를 쓸 수 없고 순차적인 접근밖에 지원되지 않으므로 while문을 써준다.

class Solution {
    public boolean isPalindrome(ListNode head) {
        Stack<Integer> stack = new Stack<>();
        LisNode node = head;

        while(node != null) {
            stack.add(node.val);
            node = node.next;
        }
    
    }
}


이렇게 담은 node와 head가 같은지 비교해준다

만약 head.val 과 stack.pop 이 한번이라도 같지않을 경우에는 무조건 팰린드롬이 아니기때문에 false를 보내주고

해당 if문에 걸리지않을 동안에는 계속 순차적으로 비교해야하기때문에 next를 처리해준다

class Solution {
    public boolean isPalindrome(ListNode head) {
        Stack<Integer> stack = new Stack<>();
        LisNode node = head;

        while(node != null) {
            stack.add(node.val);
            node = node.next;
        }

        while (head != null) {
            if (head.val != stack.pop()) {
            	return false;
            }
            head = head.next;
        }
    	return true;
    }
}


stack 은 후입선출이기때문에 stack.pop() 처리를 하면 스택에서 해당값을 꺼내고 해당값은 없애준다.

그래서 얘도 별도로 index 를 지칭해주지않아도 된다.

if문에 걸리지않았다면 true 이므로 true 반환하고 끝.


리스트 추출방법 2 - Deque

Stack 보다 빠르게 처리될 수 있는 Deque를 사용해보자.


여기서의 Deque 구현은 LinkedList로 했는데, 다른 식으로 구현이 가능하다.

하지만 현재는 연결리스트를 공부하고있으므로 LinkedList로 구현했다.

class Solution {
    public boolean isPalindrome(ListNode head) {
    	Deque<Integer> deque = new LinkedList<>();
    }
}


그리고 Stack 과 동일하게, 별도 node를 만들어줘서 head를 저장할 필요가 없다.

우리는 Deque 의 앞뒤를 비교할것이기때문에 !

class Solution {
    public boolean isPalindrome(ListNode head) {
        Deque<Integer> deque = new LinkedList<>();

        while(head != null) {
            deque.add(head.val);
            head = head.next;
        }
    
    }
}


deque 에서도 add를 써준다.


Deque 는 앞/뒤에서 모두 추출 가능하므로 Deque 의 맨앞 & 맨뒤를 비교하면 팰린드롬인지 알수있다.

그리고 만약 해당 리스트가 짝수면 list.size 는 0이 되겠지만, 홀수라면 list.size = 1 이 되어버리므로, 1 이하였을때 종료되도록 해주자

class Solution {
    public boolean isPalindrome(ListNode head) {
        Deque<Integer> deque = new LinkedList<>();

        while(head != null) {
            deque.add(head.val);
            head = head.next;
        }
        
        while(!deque.isEmpty() && deque.size() > 1 ) {
        	if(deque.pollFirst() != deque.pollLast()) {
            	return false;
            }
        }
    	return true; 
    }
}


이렇게하면 deque가 empty 이면 (짝수) 종료되고, size가 1이어도 (홀수) 종료된다.

pollFirst() , pollLast() 는 각각 값을 꺼내오고 해당값을 탈출시키기때문에 deque 에서 값이 계속 빠져나간다.


Deque 문법


  • 앞쪽에서 작업:
    • addFirst(E e) - 맨 앞에 요소 추가
    • removeFirst() - 맨 앞의 요소 제거
    • peekFirst() - 맨 앞의 요소를 반환 (제거하지 않음)
  • 뒤쪽에서 작업:
    • addLast(E e) - 맨 뒤에 요소 추가
    • removeLast() - 맨 뒤의 요소 제거
    • peekLast() - 맨 뒤의 요소를 반환 (제거하지 않음)
  • 일반 큐 작업:
    • offer(E e) - 맨 뒤에 요소 추가 (큐의 add와 동일)
    • poll() - 맨 앞의 요소 제거 및 반환
    • peek() - 맨 앞의 요소를 반환 (제거하지 않음)
  • 스택 작업:
    • push(E e) - 맨 앞에 요소 추가 (스택의 push와 동일)
    • pop() - 맨 앞의 요소 제거 및 반환 (스택의 pop과 동일)

기존의 stack 에서는 본체 node와 stack 을 비교했다면 deque 를 사용할 경우 해당 Deque 하나에서 앞뒤를 구분한다.


리스트 추출방법 - Runner

팰린드롬 연결 리스트 문제를 푸는 정공법은 러너기법이라고 한다.


ListNode 2개를 만들어서 한개는 .next.next 나머지한개는 .next 를 하게해서 빠른러너/느린러너를 생성한다.

class Solution {
    public boolean isPalindrome(ListNode head) {
        ListNode fast = head, slow = head;
    }
}


두 ListNode 모두 head 를 담아놓고 초기화를 시켜준다.


그리고 fast 가 2칸 (.next.next)을 가고 slow가 1칸 (.next)을 가게 해준다.

그러면 결국에는 fast가 끝에다다랐을때 slow는 딱! 중간에 위치하게된다.


하지만 이것은 홀수의 이야기이고, 만약 짝수일때는 이미 .next 까지만 값이 있고 .next.next 에는 값이없다!

때문에 홀수/짝수를 모두 생각해서 조건을 넣어준다.

class Solution {
    public boolean isPalindrome(ListNode head) {
        ListNode fast = head, slow = head;
        
        while(fast != null && fast.next != null {
            fast = fast.next.next;
            slow = slow.next;
        }
    }
}


fast == null 이면 홀수로 끝났고 fast != null 이지만 fast.next == null 일때는 짝수로 끝나기때문에 저렇게 조건을 해준다.

그런데 여기까지만처리해주면 여전히 slow는 1칸을 마저 가지못하고 남아있기때문에 한칸을 마저 옮겨준다.


class Solution {
    public boolean isPalindrome(ListNode head) {
        ListNode fast = head, slow = head;
        
        while(fast != null && fast.next != null {
            fast = fast.next.next;
            slow = slow.next;
        }
        
        if (fast != null) {
        	slow = slow.next;
        }
        
    }
}


이렇게까지 되면 fast 는 head 를 모두 끝냈고, slow 는 head의 딱 정중앙에 있는것이다.

fast 는 slow를 구하기위해 희생된 느낌이다.


자 이제 배열의 정중앙에 있는 slow를 이용해서 팰린드롬 여부를 확인해보자.

class Solution {
    public boolean isPalindrome(ListNode head) {
        ListNode fast = head, slow = head;

        while (fast != null && first.next != null) {
            fast = fast.next.next;
            slow = slow.next
        }

        if (fast != null) {
            slow = slow.next;
        }

        ListNode rev = null;
        while (slow != null) {
            ListNode next = slow.next;
            slow.next = rev;
            rev = slow;
            slow = next;
        }
    }
}


여기서 뇌정지가 왔는데 하나하나 살펴보자.


첫번째 루프


ex) [1, 2, 3, 4, 3, 2, 1]

ListNode rev = null;
while (slow != null) {
    ListNode next = slow.next; // next = 3
    slow.next = rev;  // slow.next = null
    rev = slow;     // rev = 4
    slow = next;    // slow = 3
}


현재 slow : 4 -> 3 -> 2 -> 1

next 에 slow.next 를 담아둔다


slow.next = rev;


이 행위로 slow.next 를 null로 만들어줬다.

지금 slow는 4 -> null 인것이다!!! 

왜냐면 현재 slow는 냅두고 slow.next 를 덮어씌우기 해버렸으니까!


rev = slow;

이걸로 rev 에 현재 slow. 즉 4 -> null 를 담았다.


slow = next;


아까 저장해둔 slow.next 를 현재 slow 에 넣어준다.

그러면 4 -> null 이 아니라 다시 3 -> 2 -> 1 이 된다.


결국 rev : 4 -> null / slow : 3 -> 2 -> 1


두번째 루프

[1, 2, 3, 4, 3, 2, 1]

ListNode rev = null;
while (slow != null) {
    ListNode next = slow.next; // next = 2
    slow.next = rev;  // slow.next = 4
    rev = slow;     // rev = 3
    slow = next;    // slow = 2
}


다시 next 에 2 -> 1  넣어두고 slow.next = 4 -> null 을 해뒀다.

이때 slow는 3 -> 4 -> null 이 된다 !! 


그럼 그것을 rev 에 넣고  slow 에는 2 -> 1 을 (slow.next)를 넣어준다.

rev : 3 -> 4 -> null

slow : 2 -> 1


세번째 루프

[1, 2, 3, 4, 3, 2, 1]

ListNode rev = null;
while (slow != null) {
    ListNode next = slow.next; // next = 1
    slow.next = rev;  // slow.next = 3
    rev = slow;     // rev = 2
    slow = next;    // slow = 1
}


slow.next = rev 를 해주면 현재 slow 는 2 -> 3 -> 4 -> null


rev : 2 -> 3 -> 4 -> null

slow : 1


네번째 루프

[1, 2, 3, 4, 3, 2, 1]

ListNode rev = null;
while (slow != null) {
    ListNode next = slow.next; // next = null
    slow.next = rev;  // slow.next = 2
    rev = slow;     // rev = 1
    slow = next;    // slow = null
}


rev : 1 -> 2 -> 3 -> 4 -> null

slow : null


이렇게 루프를 돌아서 연결리스트의 반절 ~ 후반부를 rev에 저장했다.

뒤쪽에 쌓이는게아니라 앞에 쌓이는게 어색하지만.. 여튼 완료. 이제 이것과 원래 head를 비교해보자

class Solution {
    public boolean isPalindrome(ListNode head) {
        ListNode fast = head, slow = head;

        while (fast != null && fast.next != null) {
            fast = fast.next.next;
            slow = slow.next;
        }

        if (fast != null) {
            slow = slow.next;
        }

        ListNode rev = null;
        while (slow != null) {
            ListNode next = slow.next;
            slow.next = rev;
            rev = slow;
            slow = next;
        }

        while (rev != null) {
            if (head.val != rev.val) {
                return false;
            }
            rev = rev.next;
            head = head.next;
        }
        return true;
    }
}


어짜피 rev는 head의 반절만 있으니까 while 문 조건으로 rev가 null이면 빠져나오게했다

왜이렇게 어렵게해서 만든담?!! 속도때문이지만... ㅠㅠ

728x90

'BackEnd > 알고리즘' 카테고리의 다른 글

leetcode 206. Reverse Linked List  (0) 2024.07.31
leetcode 21. Merge Two Sorted Lists  (0) 2024.07.31
[LeetCode] 1. Two Sum  (0) 2024.07.10
[LeetCode] 1598. Crawler Log Folder  (0) 2024.07.10
최빈값구하기  (0) 2023.02.20
반응형


Health Connect API 가이드 문서가 있지만.. java 기준이기도하고, 실제로 적용해보니 이슈가 몇가지생겨서 적용하는방법을 정리해보고자 한다.


가이드문서 URL : https://developer.android.com/health-and-fitness/guides/health-connect/develop/get-started?hl=ko


헬스 커넥트 시작하기  |  Android health & fitness  |  Android Developers

이 페이지는 Cloud Translation API를 통해 번역되었습니다. 헬스 커넥트 시작하기 컬렉션을 사용해 정리하기 내 환경설정을 기준으로 콘텐츠를 저장하고 분류하세요. 이 가이드에서는 앱에서 헬스

developer.android.com


시작하기에 앞서 안드로이드 버전을 확인하면 좋은데, 나는 안드로이드 13버전으로 테스트 해보았고

이 경우 health connect 앱이 설치되어있지 않았고 설치 후에도 삼성헬스데이터가 넘어오지 않았다.


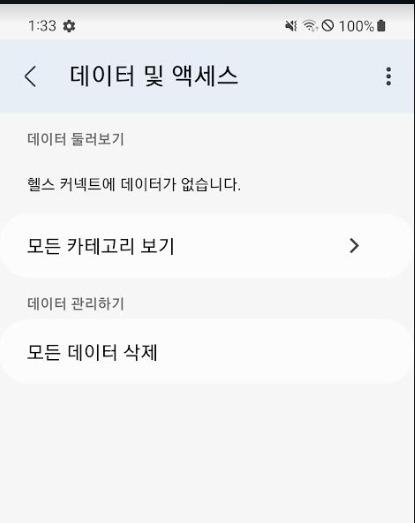
헬스커넥트 메인페이지 최근 정보에 엑세스한 앱에도 뜨지않았고 데이터 및 액세스 탭에도 데이터가 아예 없었다.


이 경우 삼성헬스 앱 - 상단 점세개 -> 문의하기 에서 헬스커넥트로 데이터연동 안되어있다고 문의하면 하루..정도 걸려서 해주신다..ㅎㅎ..참고..


1. 라이브러리 임포트 및 권한 추가


우선 build.gradle 에 health connect client 를 import 해준다

    /*Health Connect*/
    implementation "androidx.health.connect:connect-client:1.1.0-alpha02"


그리고 manifest 에 내가 취득하고싶은 권한을 넣는다.

권한종류에 관해선 가이드 문서에 상세히 나와있으니 참고하도록 하자.

<manifest xmlns:android="http://schemas.android.com/apk/res/android"
   ...
   
       <!--Health Connect Permissions-->
    <uses-permission android:name="android.permission.health.READ_STEPS"/>
    <uses-permission android:name="android.permission.health.READ_SLEEP"/>
    <uses-permission android:name="android.permission.health.READ_ACTIVE_CALORIES_BURNED"/>
    <uses-permission android:name="android.permission.health.READ_TOTAL_CALORIES_BURNED"/>
    <uses-permission android:name="android.permission.health.READ_DISTANCE"/>
    <uses-permission android:name="android.permission.health.READ_EXERCISE"/>
    <uses-permission android:name="android.permission.health.READ_FLOORS_CLIMBED"/>

    <!--Health Connect-->
    <queries>
        <package android:name="com.google.android.apps.healthdata" />
    </queries>

    ...
    
</manifest>


내가 원하는 권한 종류들을 추가하였다


2. Health Connect API 호출


해당 API 를 호출하기 원하는 activity 혹은 fragment에서 호출하면 된다.


class MainFragment : Fragment() {

    private var TAG : String = "MAIN FRAGMENT"
    private var _binding : FragmentMainBinding? = null
    private val binding : FragmentMainBinding
        get() = _binding!!

    private lateinit var healthConnectClient: HealthConnectClient
    
    //manifest 에서 선언한 권한과 동일해야함
    private val permissionList = setOf(
        HealthPermission.getReadPermission(StepsRecord::class),
        HealthPermission.getReadPermission(SleepSessionRecord::class),
        HealthPermission.getReadPermission(ActiveCaloriesBurnedRecord::class),
        HealthPermission.getReadPermission(TotalCaloriesBurnedRecord::class),
        HealthPermission.getReadPermission(DistanceRecord::class),
        HealthPermission.getReadPermission(ExerciseSessionRecord::class),
        HealthPermission.getReadPermission(FloorsClimbedRecord::class)
    )

    private val requestPermissions = registerForActivityResult(
        PermissionController.createRequestPermissionResultContract()
    ) { granted ->
        if (granted.containsAll(permissionList)) {
            Log.d("MAIN ACTIVITY", "requestPermissions success ==== ")
            CoroutineScope(Dispatchers.IO).launch {
                readStepsData()
            }
        } else {
            CustomToast.createToast(requireContext(), "건강정보 가져오기에 실패하였습니다.\n권한을 추가하거나 헬스 커넥트 앱을 다운로드 해주세요.")?.show()
            Log.d("MAIN ACTIVITY", "requestPermissions fail ////////////////// ")
            activity?.finish()
            openPlayStoreForHealthConnect()
        }
    }

    companion object {
        fun newInstance(): MainFragment {
            val fragment = MainFragment()
            val args = Bundle()
            fragment.arguments = args
            return fragment
        }
    }

    override fun onCreateView(
        inflater: LayoutInflater,
        container: ViewGroup?,
        savedInstanceState: Bundle?
    ): View {
        _binding =
            DataBindingUtil.inflate(layoutInflater, R.layout.fragment_main, container, false)
        return binding.root
    }

    override fun onViewCreated(view: View, savedInstanceState: Bundle?) {
        super.onViewCreated(view, savedInstanceState)

        // Health Connect
        CoroutineScope(Dispatchers.Main).launch {
            connectHealthData()
        }

    }

    private fun connectHealthData() {
        // 1. Health Connect 앱 유무 확인
        val availabilityStatus = HealthConnectClient.getSdkStatus(requireContext(), Constants.HEALTH_CONNECT_PACKAGE_NAME)
        if (availabilityStatus == HealthConnectClient.SDK_UNAVAILABLE) {
            CustomToast.createToast(requireContext(), "헬스 커넥트 앱을 다운로드 해주세요")?.show()
            activity?.finish()
            openPlayStoreForHealthConnect()
        }

        // 2. Health connect sdk update 확인
        if (availabilityStatus == HealthConnectClient.SDK_UNAVAILABLE_PROVIDER_UPDATE_REQUIRED) {
            CustomToast.createToast(requireContext(), "헬스 커넥트 업데이트가 필요합니다")?.show()
            activity?.finish()
            openPlayStoreForHealthConnect()
        }

        // 4. Check permissions and run
        healthConnectClient = HealthConnectClient.getOrCreate(requireContext())
        requestPermissions.launch(permissionList)
    }


    private suspend fun readStepsData() {
        val now: LocalDateTime = LocalDateTime.now()
        val startOfDay = LocalDateTime.of(now.toLocalDate(), LocalTime.MIDNIGHT)

        val request = ReadRecordsRequest(
            recordType = StepsRecord::class,
            timeRangeFilter = TimeRangeFilter.between(startOfDay, now),
        )

        val response = healthConnectClient.readRecords(request)
        val steps = response.records.sumOf { it.count }

        //토탈 칼로리
        val totalCaloriesRequest = ReadRecordsRequest(
            recordType = TotalCaloriesBurnedRecord::class,
            timeRangeFilter = TimeRangeFilter.between(startOfDay, now),
        )
        val totalCaloriesResponse = healthConnectClient.readRecords(totalCaloriesRequest)
        val totalCalories = totalCaloriesResponse.records.sumOf { it.energy.inCalories }

        //활동 칼로리
        val activeCaloriesRequest = ReadRecordsRequest(
            recordType = ActiveCaloriesBurnedRecord::class,
            timeRangeFilter = TimeRangeFilter.between(startOfDay, now),
        )
        val activeCaloriesResponse = healthConnectClient.readRecords(activeCaloriesRequest)
        val activeCalories = activeCaloriesResponse.records.sumOf { it.energy.inCalories }

        CoroutineScope(Dispatchers.Main).launch {
            binding.tvStepCount.text = steps.toString()
            binding.tvTotalCaloriesCount.text = totalCalories.toString()
            binding.tvActiveCaloriesCount.text = activeCalories.toString()
        }

    }

    private fun openPlayStoreForHealthConnect() {
        val intent = Intent(Intent.ACTION_VIEW).apply {
            data = Uri.parse("https://play.google.com/store/apps/details?id=com.google.android.apps.healthdata")
            setPackage("com.android.vending")
        }
        startActivity(intent)
    }
}


삼성헬스 데이터가 health connect 에 연결되었는가?

health connect 버전이 최신인가?

health connect 가 설치되어있는가?


등등 우선시 되어야 할 상황들을 체크하는 로직도 추가하였다.


3. Permission Activity 추가


이상하게 이걸 추가안하면..연결 계속 fail 뜬다.

아직 파악이 덜됨..


1) PermissionActivity.kt 추가

@AndroidEntryPoint
class PermissionActivity : AppCompatActivity(){
    private lateinit var binding: ActivityPermissionBinding

    override fun onCreate(savedInstanceState: Bundle?) {
        super.onCreate(savedInstanceState)
        binding = ActivityPermissionBinding.inflate(layoutInflater)
        setContentView(binding.root)

        val permissions = setOf(
            HealthPermissions.READ_STEPS
        )

        val permissionController = HealthConnectClient.getOrCreate(this).permissionController
        //permissionController.pe(permissions, this)

    }

    private val permissionRequest = registerForActivityResult(
        ActivityResultContracts.StartActivityForResult()
    ) {
        // 권한 요청 후의 결과 처리
        // 필요한 경우 MainActivity로 돌아가게 함
        startActivity(Intent(this, MainActivity::class.java))
    }


2) layout 추가

<?xml version="1.0" encoding="utf-8"?>
<layout xmlns:android="http://schemas.android.com/apk/res/android"
    xmlns:app="http://schemas.android.com/apk/res-auto"
    xmlns:tools="http://schemas.android.com/tools">

    <androidx.constraintlayout.widget.ConstraintLayout
        android:layout_width="match_parent"
        android:layout_height="match_parent"
        tools:context=".PermissionActivity">

        <TextView
            android:text="test - permission"
            android:layout_width="match_parent"
            android:layout_height="match_parent"/>

        <com.google.android.material.bottomnavigation.BottomNavigationView
            android:id="@+id/nav_area"
            android:layout_width="match_parent"
            android:layout_height="56dp"
            app:layout_constraintBottom_toBottomOf="parent"
            app:layout_constraintEnd_toEndOf="parent"
            app:layout_constraintStart_toStartOf="parent"
            app:menu="@menu/navigation_menu"
            app:itemIconTint="@color/black"
            app:labelVisibilityMode="labeled"
            app:itemTextColor="@android:color/transparent"/>

    </androidx.constraintlayout.widget.ConstraintLayout>

</layout>


3) Manifest 수정

  ....
  
  <activity
            android:name=".MainActivity"
            android:exported="true">
            <intent-filter>
                <action android:name="android.intent.action.MAIN" />

                <category android:name="android.intent.category.LAUNCHER" />
            </intent-filter>
        </activity>

        <activity
            android:name=".ui.permission.PermissionActivity"
            android:exported="true">
            <intent-filter>
                <action android:name="androidx.health.ACTION_SHOW_PERMISSIONS_RATIONALE" />
            </intent-filter>
        </activity>
        ...


해당코드는 깃헙에 올려두었다.


그런데, PermissionActivity 추가하는 로직에 관해선, 공식문서에 나와잇지만 안드로이드12이상부터는 아래와같이써야한다

 <activity
            android:name=".ui.permission.PermissionActivity"
            android:exported="true">
            <intent-filter>
                <action android:name="androidx.health.ACTION_SHOW_PERMISSIONS_RATIONALE" />
            </intent-filter>
        </activity>

        <activity-alias
            android:name="ViewPermissionUsageActivity"
            android:exported="true"
            android:targetActivity=".ui.permission.PermissionActivity"
            android:permission="android.permission.START_VIEW_PERMISSION_USAGE">
            <intent-filter>
                <action android:name="android.intent.action.VIEW_PERMISSION_USAGE" />
                <category android:name="android.intent.category.HEALTH_PERMISSIONS" />
            </intent-filter>
        </activity-alias>


아래 링크의 Fitness 프로젝트!

https://github.com/Daseul727/Mobile-Skill-Up


+

2024.10.29

하지만 결국..데이터 잘 안뽑혀서 삼성헬스 -> 점세개 -> 설정 -> 고객센터 -> 1:1문의에서 헬스커넥터로 데이터 안들어온다고 캡쳐화면이랑 문의글 올리면...들어오게 처리해준다 ㅠ 답변은 따로없다..다음날이나 몇시간 후 확인해보면됨..

728x90
반응형


Kotlin Native Android App 개발 중 걸음수가 필요해서 Samsung Health API 를 달려고 했는데

결론적으로는 Samsung partnership 등록이 필요했고, 현재로서는 더이상 받고있지않는다는 답변을 받았다.

질문 올렸던 URL : https://forum.developer.samsung.com/t/samsung-health-api-is-not-working-for-android-device/33200/2


하지만 작업한게 아까워서 기록용으로 남기려고한다.


이 모든것은 작동안되는 방법이므로 health connect 앱으로 작업하세요!!


1. SDK 다운로드


SDK 추가방법은 build.gradle 에 추가하거나 직접 파일추가하는 방법이 있다.

build.gradle 에 추가했을때 import가 되지 않아서 나는 아래 링크의 예제 프로젝트에서 받았다

(simplehealth\app\src\main\libs\samsung-health-data-1.5.0.aar)

https://developer.samsung.com/health/android/sample/simple-health.html


Data | SimpleHeath | Samsung Developer

The world runs on you.

developer.samsung.com


그리고 내 프로젝트의 libs에 넣고 build.gradle에 file 위치를 알려줬다.

    /*Samsung sdk*/
    implementation files('libs/samsung-health-data-1.5.0.aar')


2. AndroidManifest 수정


<manifest>

...
    <uses-permission android:name="android.permission.INTERNET"/>

    <uses-permission android:name="com.samsung.android.providers.context.permission.WRITE_USE_APP_FEATURE_SURVEY"/>
    <uses-permission android:name="android.permission.READ_EXTERNAL_STORAGE"/>
    <uses-permission android:name="android.permission.WRITE_EXTERNAL_STORAGE"/>

    <!--삼성 SDK-->
    <queries>
        <package android:name="com.sec.android.app.shealth" />
    </queries>

    <application

        ....
    >

        <!--삼성 SDK 권한-->
        <meta-data android:name="com.samsung.android.health.permission.read"
            android:value="com.samsung.health.step_count;com.samsung.shealth.step_daily_trend;com.samsung.health.exercise"/>

        <activity
            android:name=".ui.main.MainActivity"
            ...
        />

	</application>

</manifest>


마지막 삼성 SDK 권한쪽 보면 value에 원하는 데이터를 콤마의 형태로 여러번 불러올수있다.

나는 읽기만 필요하니까 read 만 호출한것.


참고 가이드 URL : https://developer.samsung.com/health/android/data/api-reference/com/samsung/android/sdk/healthdata/HealthPermissionManager.html


3. Samsnung Health API 연동


1) initDataStore 메소드에서 HealthDataStore 를 초기화시키고 실행

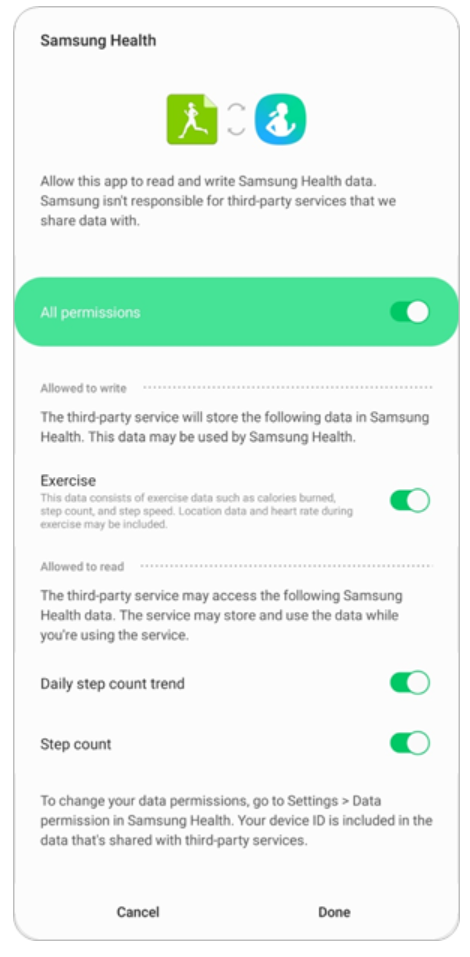
2) onConnected 에서 필요한 권한을 세팅하고 (이때 Manifest에서 설정한 권한과 동일해야함) 권한 request

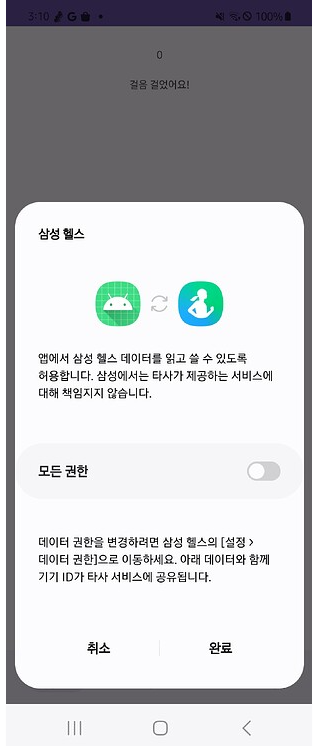
3) 그러면 권한 입력하는 팝업이 호출됨 


4) 권한 선택 여부가 mPermisionListener 로 들어옴

...

import com.samsung.android.sdk.healthdata.HealthConnectionErrorResult
import com.samsung.android.sdk.healthdata.HealthConstants
import com.samsung.android.sdk.healthdata.HealthConstants.Exercise
import com.samsung.android.sdk.healthdata.HealthConstants.StepDailyTrend
import com.samsung.android.sdk.healthdata.HealthDataResolver
import com.samsung.android.sdk.healthdata.HealthDataStore
import com.samsung.android.sdk.healthdata.HealthDataStore.ConnectionListener
import com.samsung.android.sdk.healthdata.HealthPermissionManager
import com.samsung.android.sdk.healthdata.HealthPermissionManager.PermissionKey
import com.samsung.android.sdk.healthdata.HealthPermissionManager.PermissionResult
import com.samsung.android.sdk.healthdata.HealthPermissionManager.PermissionType
import com.samsung.android.sdk.healthdata.HealthResultHolder


@AndroidEntryPoint
class HomeFragment : Fragment() {

    private var TAG : String = "HOME FRAGMENT"
    private lateinit var mStore: HealthDataStore
    private lateinit var mKeySet: MutableSet<PermissionKey>

	...

    override fun onViewCreated(view: View, savedInstanceState: Bundle?) {
        super.onViewCreated(view, savedInstanceState)
        
        //삼성 SDK 초기화
        initDataStore()
    }


    /**
     * 삼성 SDK 초기화
     */
    private fun initDataStore() {
    	//activity 에서 실행한다면 requireContext 대신 this
        mStore = HealthDataStore(requireContext(), mCntListener) 
        mStore.connectService()
    }

    /**
     * 삼성 SDK Listener 설정
     */
    private val mCntListener: ConnectionListener = object : ConnectionListener {
        override fun onConnected() {
            Log.d(TAG, "Health data service is connected.")

            val mManager = HealthPermissionManager(mStore)

            //내가 원하는 권한요청
            mKeySet = HashSet()
            mKeySet.add(PermissionKey(HealthConstants.StepCount.HEALTH_DATA_TYPE, PermissionType.READ))
            mKeySet.add(PermissionKey(StepDailyTrend.HEALTH_DATA_TYPE, PermissionType.READ))

            val resultMap : MutableMap<PermissionKey, Boolean> = mManager.isPermissionAcquired(mKeySet)

            if(resultMap.containsValue(false)) { //만약 권한이 없다면 권한요청 UI 팝업
                mManager.requestPermissions(mKeySet, requireActivity()).setResultListener(mPermissionListener)
            } else {
                binding.tvStepCountText.text = getStepCount().toString()
            }
        }

        override fun onConnectionFailed(error: HealthConnectionErrorResult) {
			//연결 실패 시 실행할 로직
        }

        override fun onDisconnected() {
            mStore.disconnectService() // 연결종료
        }
    }

    private val mPermissionListener = HealthResultHolder.ResultListener<PermissionResult> { result ->
        Log.d(TAG, "Permission callback is received.")
        val resultMap = result.resultMap

        if (resultMap.containsValue(false)) {
            Log.d(TAG, "Permission false")
        } else {
            binding.tvStepCountText.text = getStepCount().toString()
        }
    }
    
    private fun getStepCount() : Int{
    var stepCount = 0;

    val resolver = HealthDataResolver(mStore, null)
    val request = HealthDataResolver.ReadRequest.Builder()
        .setDataType(HwConstants.DATA_TYPE_STEP_COUNT)
        .build()

    resolver.read(request).setResultListener { result ->
        val iterator = result.iterator()
        while (iterator.hasNext()) {
            val data = iterator.next()
            stepCount = data.getInt("count")
        	}
        	result.close()
    	}
    	return stepCount
	}
}


나의 경우 3번을 진행하다가 아무리해도 권한체크하는 영역이 노출되지않아서 문의를 했었다.


모든권한 하단에 내가 요청한 권한목록이 떴어야 했는데... 


결론적으로는 해당 API 는 삼성 파트너쉽 앱 등록 후 사용하여야하는데 현재 서비스 리뉴얼중으로 (몇달간 계속되는듯..) 사용불가.


걸음수 가져가고싶으면 헬스 커넥트 앱을 사용하라는 답변!

후... 이거 다 지우고 헬스 커넥트 앱으로 재도전 ^^....


728x90
반응형


문제 링크 : https://leetcode.com/problems/two-sum/description/


처음 submit 한 코드


public static int[] twoSum(int[] nums, int target) {
        int[] result = new int[2];
        boolean isBreak = false;
        for (int i = 0; i < nums.length; i++) {

            if (isBreak) break;

            for (int j = i+1; j < nums.length; j++) {
                if (nums[i] + nums[j] == target) {
                    result[0] = i;
                    result[1] = j;
                    isBreak = true;
                    break;
                }
            }
        }
        return result;
    }
}


불필요한 break가 많다. 전체적으로 보기 불편하다


개선된 코드

class Solution {
    public int[] twoSum(int[] nums, int target) {
        int[] result = new int[2];
        boolean isBreak = false;
        for (int i = 0; i < nums.length; i++) {
            for (int j = i+1; j < nums.length; j++) {
                if (nums[i] + nums[j] == target) {
                    return new int[]{i,j};
                }
            }
        }
        return result;
    }
}


바로 return 시켜버리면 된다

728x90

'BackEnd > 알고리즘' 카테고리의 다른 글

leetcode 21. Merge Two Sorted Lists  (0) 2024.07.31
leetcode 234. Palindrome Linked List  (0) 2024.07.27
[LeetCode] 1598. Crawler Log Folder  (0) 2024.07.10
최빈값구하기  (0) 2023.02.20
대소문자 변환  (0) 2023.02.20
반응형


폴더 depth 파악문제


문제 링크 : https://leetcode.com/problems/crawler-log-folder


내가 푼 문제

class Solution {
    public int minOperations(String[] logs) {
        int result = 0;
        for (String log : logs) {
            if (log.equals("./")) {
                result += 0;
            } else if (log.equals("../")) {
                if (result <= 0) {
                    result = 0;
                } else {
                    result -= 1;
                }
            } else {
                result += 1;
            }
        }
        return result;
    }
}


if 밭이다 밭.


이걸 개선


class Solution {
    public int minOperations(String[] logs) {
        int depth = 0;
        for (String log : logs) {
            if (log.equals("../")) {
                if (depth > 0) {
                    depth--;
                }
            } else if (!log.equals("./")) {
                depth++;
            }
        }
        return depth;
    }
}


차라리 상단에서 depth 를 -- 주고 ./ 가 아닐때만 ++ 하면 됨

728x90

'BackEnd > 알고리즘' 카테고리의 다른 글

leetcode 21. Merge Two Sorted Lists  (0) 2024.07.31
leetcode 234. Palindrome Linked List  (0) 2024.07.27
[LeetCode] 1. Two Sum  (0) 2024.07.10
최빈값구하기  (0) 2023.02.20
대소문자 변환  (0) 2023.02.20

+ Recent posts