예제로, 특정 버튼을 클릭하면 홈화면이 뜨도록 해보자.
나는 IntroActivity 를 생성하고 버튼을 클릭하면 MainActivity 가 뜨도록 수정할것이다.
1. Intro Activity 생성
지난 포스팅에서와 같이, Activity 는 화면이라고 이해하면 되겠다.

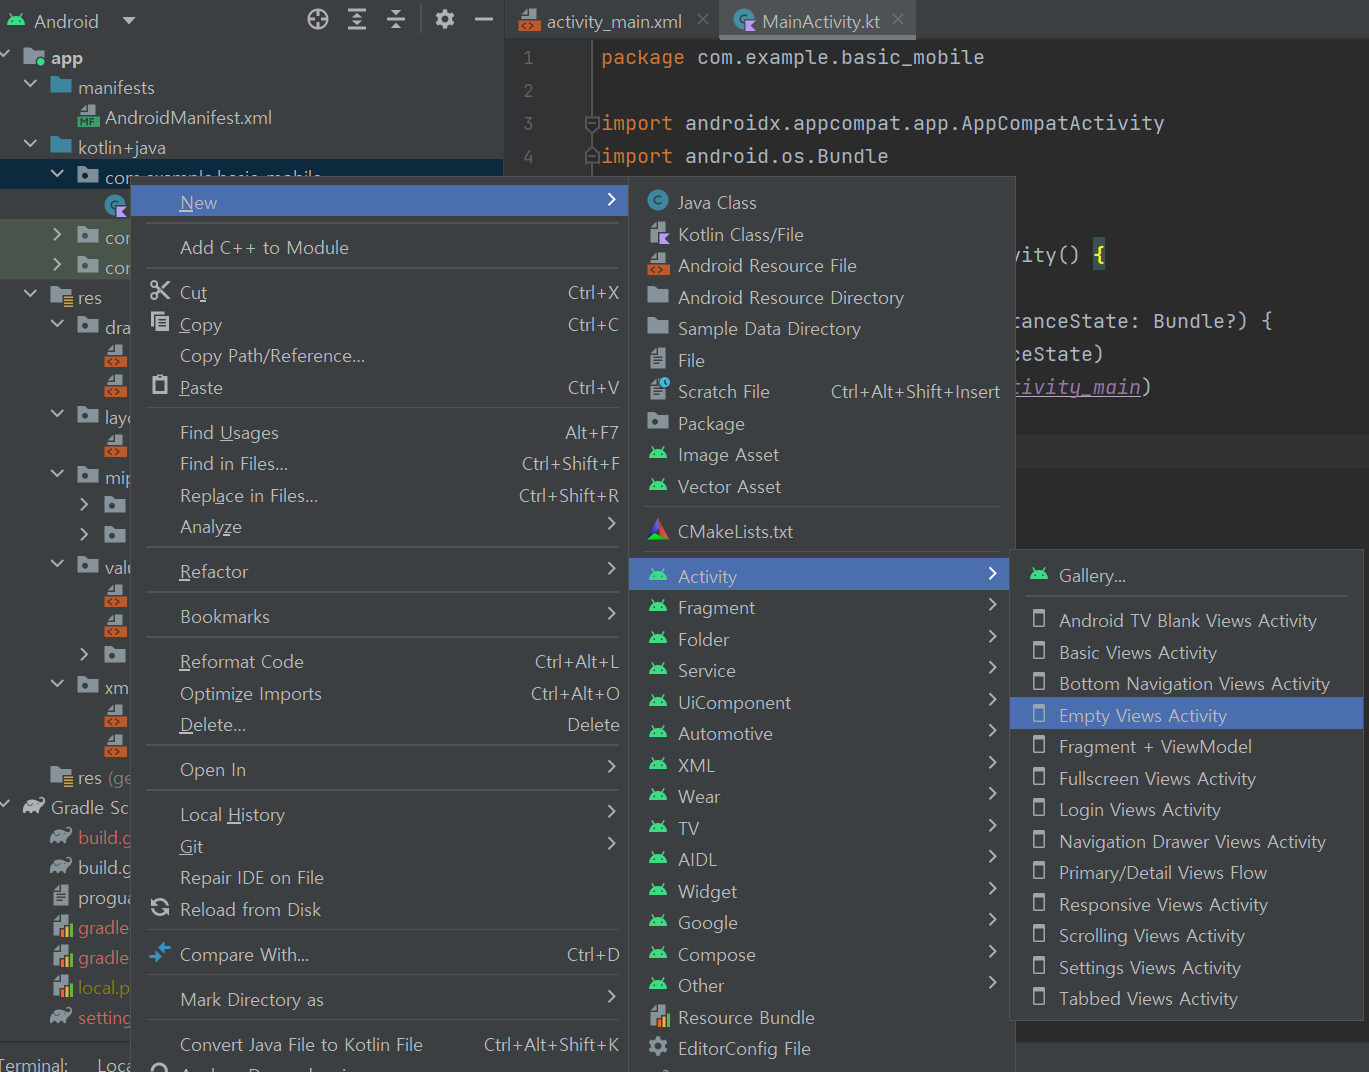
MainActivity 의 상위 패키지에서 New > Activity > Empty Views Activity 를 선택한다
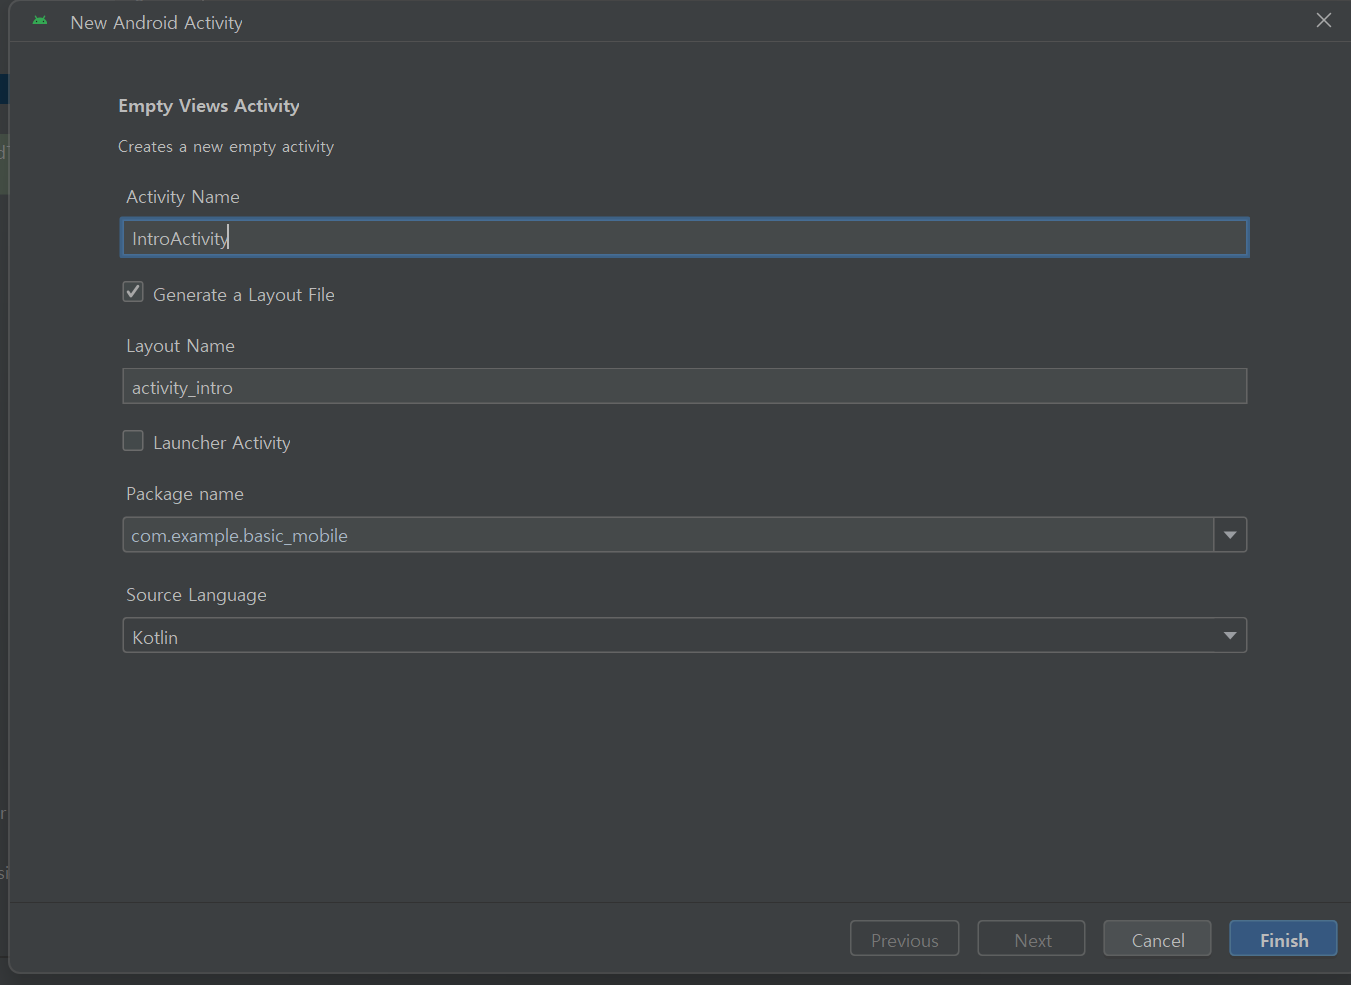
새로운 Activity 이름은 IntroActivity 로 설정하자
Layout Name 은 자동으로 바뀔텐데 혹시 자동으로 바뀌지않았다면 activity_intro 라고 입력해주자

2. Intro 꾸미기
아래와 같이 깔끔하게 기본세팅해준다
<?xml version="1.0" encoding="utf-8"?>
<layout xmlns:android="http://schemas.android.com/apk/res/android"
    xmlns:app="http://schemas.android.com/apk/res-auto"
    xmlns:tools="http://schemas.android.com/tools">

</layout>
이곳이 Intro Activity 임을 알수있게 꾸며주자.
간단하게 텍스트를 추가해보겠다. 웹에서는 <input> 태그를 사용했다면, 안드로이드에서는 EditText, 혹은 TextView 를 사용한다.
EditText는 수정가능한 <input> 이고, TextVeiw 는 수정불가한 <p> 태그와 비슷하다
<?xml version="1.0" encoding="utf-8"?>
<layout xmlns:android="http://schemas.android.com/apk/res/android"
    xmlns:app="http://schemas.android.com/apk/res-auto"
    xmlns:tools="http://schemas.android.com/tools">

////추가////
    <TextView
        android:text="This is Intro"
        android:layout_width="match_parent"
        android:layout_height="match_parent"/>

</layout>
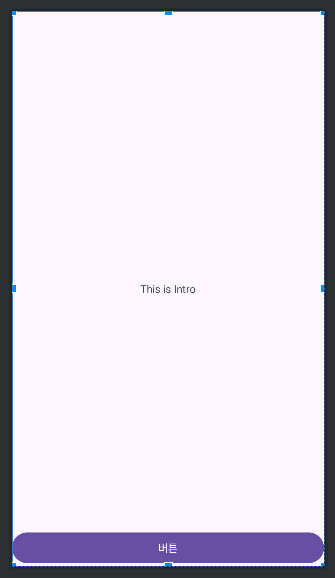
이렇게하면 우측 미리보기화면에 글자가 나와있는것을 볼 수 있다.
만약 layout_width, height 를 설정하지않으면 글자가 안보인다. 해당 설정을 해줘야만 보인다
여기에, 버튼을 하나 추가해보자.
<?xml version="1.0" encoding="utf-8"?>
<layout xmlns:android="http://schemas.android.com/apk/res/android"
    xmlns:app="http://schemas.android.com/apk/res-auto"
    xmlns:tools="http://schemas.android.com/tools">
    <TextView
        android:text="This is Intro"
        android:layout_width="match_parent"
        android:layout_height="match_parent"/>

///추가/////
    <Button
        android:text="버튼"
        android:layout_width="match_parent"
        android:layout_height="wrap_content"/>
</layout>
이상하게도 버튼이 보이지않는다.
이럴때 필요한게 웹에서의 <li> 와 같은 기능이다.
안드로이드는 여러가지 요소를 세로, 혹은 가로로 나타나고싶을때 부모태그를 추가해줘야한다.
ConstraintLayout 을 쓰면 자동완성으로 아래와 같은 태가 보인다.
<?xml version="1.0" encoding="utf-8"?>
<layout xmlns:android="http://schemas.android.com/apk/res/android"
    xmlns:app="http://schemas.android.com/apk/res-auto"
    xmlns:tools="http://schemas.android.com/tools">

////추가/////
    <androidx.constraintlayout.widget.ConstraintLayout
        android:layout_width="match_parent"
        android:layout_height="match_parent"
        android:orientation="vertical">
        <TextView
            android:text="This is Intro"
            android:layout_width="match_parent"
            android:layout_height="match_parent"/>

        <Button
            android:text="버튼"
            android:layout_width="match_parent"
            android:layout_height="wrap_content"/>
    </androidx.constraintlayout.widget.ConstraintLayout>
</layout>
width, height 를 match_parent로 해준다. 높이 넓이를 부모요소와 같게 하겠다는 뜻이다.
나는 텍스트와 버튼을 세로정렬로 해주고싶어서 orientation = vertical 인데, 세로정렬은 horizontal 이다
하지만 이렇게하면 버튼이 TextView를 덮어버리므로 버튼을 맨 아래로 보내고 TextView 를 정가운데로 보내보자.
<?xml version="1.0" encoding="utf-8"?>
<layout xmlns:android="http://schemas.android.com/apk/res/android"
    xmlns:app="http://schemas.android.com/apk/res-auto"
    xmlns:tools="http://schemas.android.com/tools">

    <androidx.constraintlayout.widget.ConstraintLayout
        android:layout_width="match_parent"
        android:layout_height="match_parent"
        android:orientation="vertical">
        <TextView
            android:text="This is Intro"
            android:layout_width="wrap_content" ////수정////
            android:layout_height="wrap_content" ////수정////
            app:layout_constraintTop_toTopOf="parent" ////추가////
            app:layout_constraintBottom_toBottomOf="parent" ////추가////
            app:layout_constraintStart_toStartOf="parent" ////추가////
            app:layout_constraintEnd_toEndOf="parent"/> ////추가////

        <Button
            android:text="버튼"
            android:layout_width="match_parent"
            android:layout_height="wrap_content"
            app:layout_constraintBottom_toBottomOf="parent"/> ////추가////
    </androidx.constraintlayout.widget.ConstraintLayout>

</layout>
이렇게 인트로 화면을 만들었다.
TextView 를 wrap_content 로 바꾼이유는, 상위요소 기준으로 가운데로 보내야되는데 넓이가 부모만큼 크면 어디로 보내야할지 모르게 된다.
그래서 TextView 범위는 content 를 감쌀정도, 작게 만들고 상위요소를 기준으로 해당 컨텐츠 위치를 조정하는 의미이다

3. Main Activity 로 이동하기
버튼을 누르면 MainActivity 로 이동시켜주려고 한다.
그러려면 버튼에 클릭이벤트를 주어야한다.
우선 버튼에 id를 할당하자.
//activity_intro.xml

<?xml version="1.0" encoding="utf-8"?>
<layout xmlns:android="http://schemas.android.com/apk/res/android"
    xmlns:app="http://schemas.android.com/apk/res-auto"
    xmlns:tools="http://schemas.android.com/tools">

    <androidx.constraintlayout.widget.ConstraintLayout
        android:layout_width="match_parent"
        android:layout_height="match_parent"
        android:orientation="vertical">
        <TextView
            android:text="This is Intro"
            android:layout_width="wrap_content"
            android:layout_height="wrap_content"
            app:layout_constraintTop_toTopOf="parent"
            app:layout_constraintBottom_toBottomOf="parent"
            app:layout_constraintStart_toStartOf="parent"
            app:layout_constraintEnd_toEndOf="parent"/>

        <Button
            android:id="@+id/btn_go_main" //// 추가 ////
            android:text="버튼"
            android:layout_width="match_parent"
            android:layout_height="wrap_content"
            app:layout_constraintBottom_toBottomOf="parent"/>
    </androidx.constraintlayout.widget.ConstraintLayout>

</layout>
해당 xml 의 이벤트등록 및 데이터바인딩은 모두 activity_intro.xml 의 짝꿍 IntroActivity.kt 에서 할수있다.
//introActivity

class IntroActivity : AppCompatActivity() {
    override fun onCreate(savedInstanceState: Bundle?) {
        super.onCreate(savedInstanceState)
        setContentView(R.layout.activity_intro)

        //버튼 정의
        val goMainBtn = findViewById<Button>(R.id.btn_go_main)

        //버튼 클릭 이벤트
        goMainBtn.setOnClickListener {
            val intent = Intent(this, MainActivity::class.java)
            startActivity(intent)
        }

    }
}
버튼 정의 부분을 보면
findViewById<Button>(R.id.btn_go_main)
findViewById : id를 기준으로 찾을건데
<Button> : 버튼 요소이며
R.id.btn_go_main : id 는 btn_go_main
버튼을 goMainBtn 이라는 변수에 넣고 클릭이벤트를 준것이다.
Activity 간의 이동을 할때는 intent 정의 후 startActivity 로 이동한다. 이것은 공식!
외전) 버튼 정의 우아하게 하기
버튼정의할때 위의 방법은 기초적인 방법이고...실무에서 자주 쓰이는 binding 방법으로 수정하
1) build.gradle 수정
plugins {
    id 'com.android.application'
    id 'org.jetbrains.kotlin.android'
}
android {
    namespace 'com.example.basic_mobile'
    compileSdk 34
...
..
.

    kotlinOptions {
        jvmTarget = '1.8'
    }

    buildFeatures { ////추가////
        viewBinding = true
        dataBinding true
    }
}
buildfeatrures 를 추가해준다. 이것은 데이터바인딩을 하겠다는 의미.
build.gradle 수정하고 Sync now 를 클릭해준다.

2) IntroActivity 수정
class IntroActivity : AppCompatActivity() {

    private lateinit var binding : ActivityIntroBinding ////추가////

    override fun onCreate(savedInstanceState: Bundle?) {
        super.onCreate(savedInstanceState)

         ////수정////
        //binding 초기화
        binding = ActivityIntroBinding.inflate(layoutInflater)
        setContentView(binding.root)

        //버튼 정의
        val goMainBtn = binding.btnGoMain ////수정////

        //버튼 클릭 이벤트
        goMainBtn.setOnClickListener {
            val intent = Intent(this, MainActivity::class.java)
            startActivity(intent)
        }
    }

}
binding 이라는 변수를 추가해주고, activity_intro.xml과 연결시킨다.
본인의 나는 activity_intro.xml 이라서 ActivityIntroBinding 이지만
만약 activity_sample,xml 이라면 ActivitySampleBinding 일것이다.
어짜피 자동완성되므로 괜춘.
4. 앱 실행 시 Intro Activity 실행
AndroidManifest.xml로 가서 앱 첫진입대상을 바꿔주자
<?xml version="1.0" encoding="utf-8"?>
<manifest xmlns:android="http://schemas.android.com/apk/res/android"
    xmlns:tools="http://schemas.android.com/tools">

    <application
        android:allowBackup="true"
        android:dataExtractionRules="@xml/data_extraction_rules"
        android:fullBackupContent="@xml/backup_rules"
        android:icon="@mipmap/ic_launcher"
        android:label="@string/app_name"
        android:roundIcon="@mipmap/ic_launcher_round"
        android:supportsRtl="true"
        android:theme="@style/Theme.Basic_mobile"
        tools:targetApi="31">
        <activity
            android:name=".MainActivity" //// 수정 ////
            android:exported="false" />
        <activity
            android:name=".IntroActivity" //// 수정 ////
            android:exported="true">
            <intent-filter>
                <action android:name="android.intent.action.MAIN" />

                <category android:name="android.intent.category.LAUNCHER" />
            </intent-filter>
        </activity>
    </application>

</manifest>
이렇게하면, 앱 첫진입은 intro에서하고 버튼누르면 MainActivity 로 페이지 이동하는것을볼 수 있다.
만약 에러가 발생한다면 Logcat 을 확인하자
좌측 상단에 현재 내 에뮬레이터 기기가 맞는지 유의할것!!

디버깅이 필요하다면 벌레모양 클릭~

원하는 코드에 breack point 생성~

최종적으로 아래와 같은 동작을 확인할 수 있다.

'Mobile > Android' 카테고리의 다른 글
| Kotlin - Android 앱 개발하기 (4) - 타이틀 바 추가 (0) | 2024.03.05 |
|---|---|
| Kotlin - Android 앱 개발하기 (3) - splash 추가 (0) | 2024.02.26 |
| Kotlin - Android 앱 개발하기 (1) - 프로젝트 생성 (0) | 2024.02.23 |
| eclipse android - sdk 위치 변경 및 sdk manager (0) | 2024.01.19 |
| eclipse jar import 하는방법 (class not found될때) (0) | 2024.01.19 |